Changing stylist name on a ticket due to an error
Incase if there was an error with a ticket where the stylist name is incorrect please follow the steps below to change to the correct name. This should be only performed by a manger. If there is no manager please contact DL or owner.
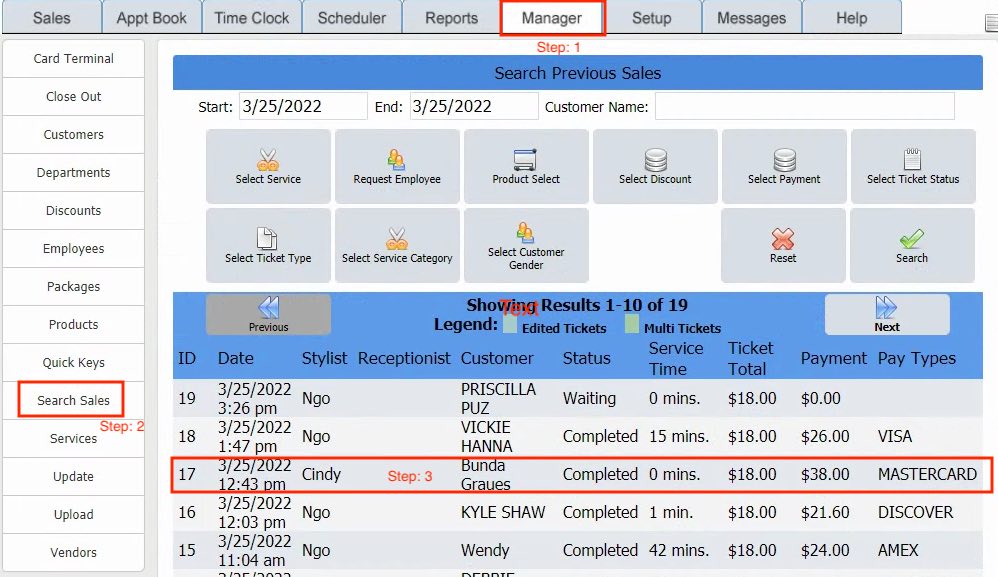
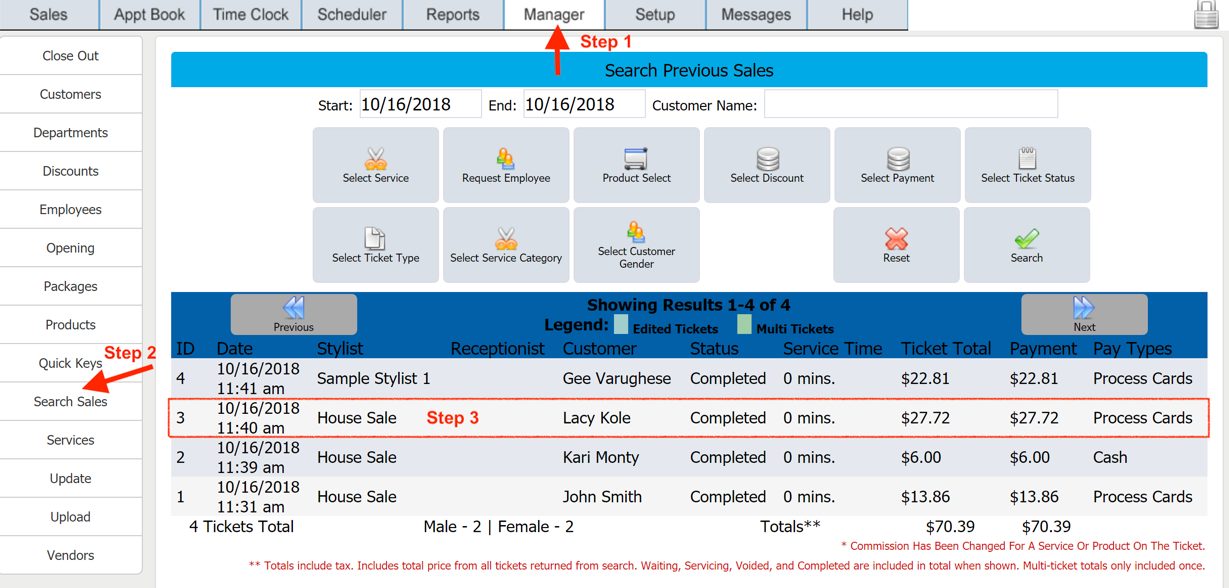
Step 1: Go to Manger tab
Step 2: Click on Search Sales
Step 3: Click on the ticket that needs to be edited
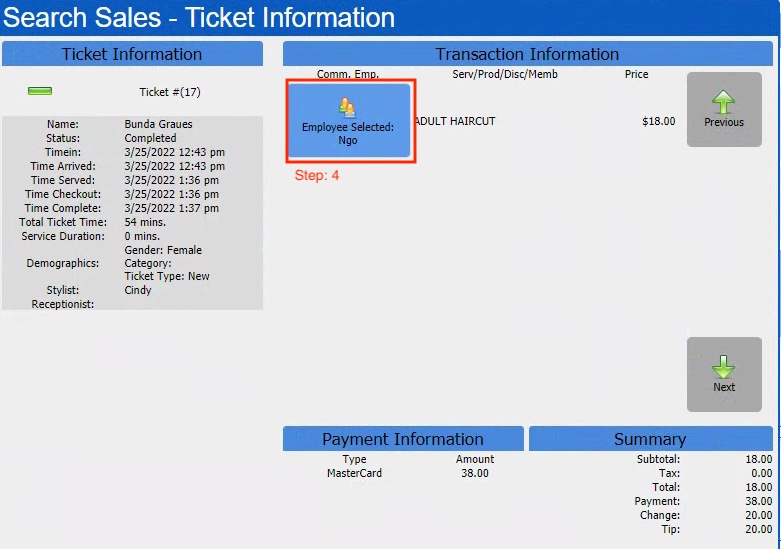
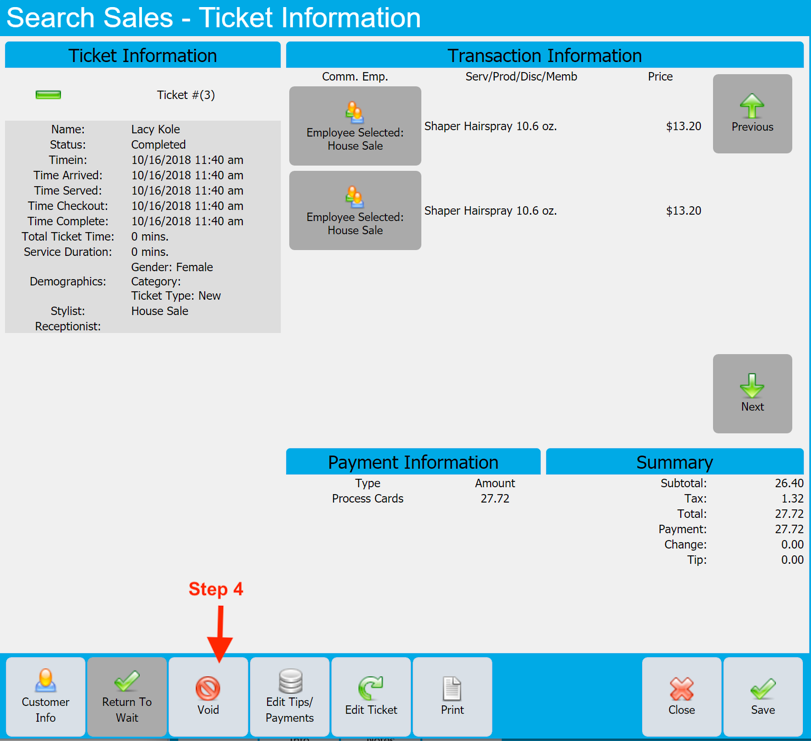
Step 4: Click on Stylist name
Step 5: Select the correct stylist name
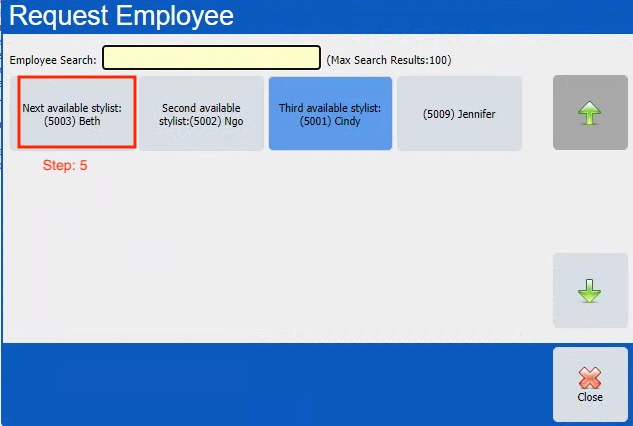
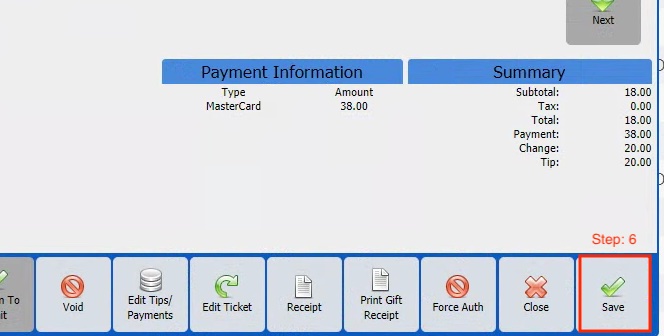
Step 6: Click on Save
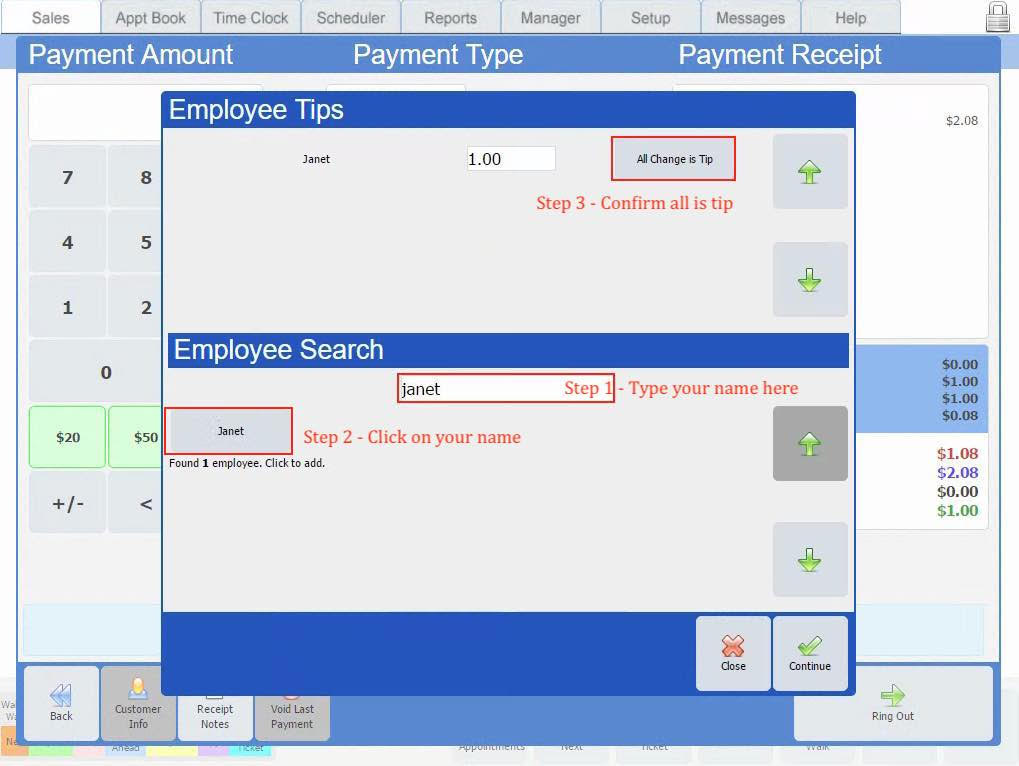
When we are selling products only please tell the customer to skip the Tip option on the credit card terminal. If they insist on giving you a tip please do the following on the screen when you press the Ring Out to make sure you get the tip.
When you press the Ring Out you will see the following screen. At the bottom section you need to search for your name
(step 1), click on your name
(step 2) and finally make sure all of the change is tip (step 3).
This is the only way you will get the tip on the Branch card.
Void (Incorrect Payment or other issues on the same day of original transaction)
If you need to void a ticket (only applicable if done on the same day of transaction). This should only be used if there is a mistake in price and/or payment and needs to be corrected on the same day. This will completely void the ticket and a new ticket needs to be created to re-do the transaction.
Voided ticket should be kept in the daily closeout book folder for manager to review.
1. Click on Manager tab at the top of the screen (it can be done by Manger/Stylist)
2. Click on Search Sales from the left menu.
3. Find the ticket that needs to be voided. IMPORTANT: Do not void valid tickets as this will void the payment and will not have a way to get payment from a customer who left the salon.
4. When you select the ticket that needs to be voided you will see a new pop up window showing the details of the ticket with the Void button at the bottom. Again verify if this is correct ticket and click on Void button. Another pop up window will ask you to put the reason for voiding.
Refunds (Service only with Manager/DL/Owner approval)
Make sure customer has a receipt to do any Refund. Refund on service must be within 7 days of service and there is no refund on retail products. Please get approval from Manager, District Leader or Owner prior to doing a refund.
DO NOT USE QUICKSALE BUTTON FOR REFUNDS.
1. Start with a New Ticket like any time selling service/products.
2. Ask for the customer’s phone number and select the customer if highlighted and go to Step 4.
3. If the customer’s name is not shown add a new customer by clicking the Add New customer at bottom left of the window.
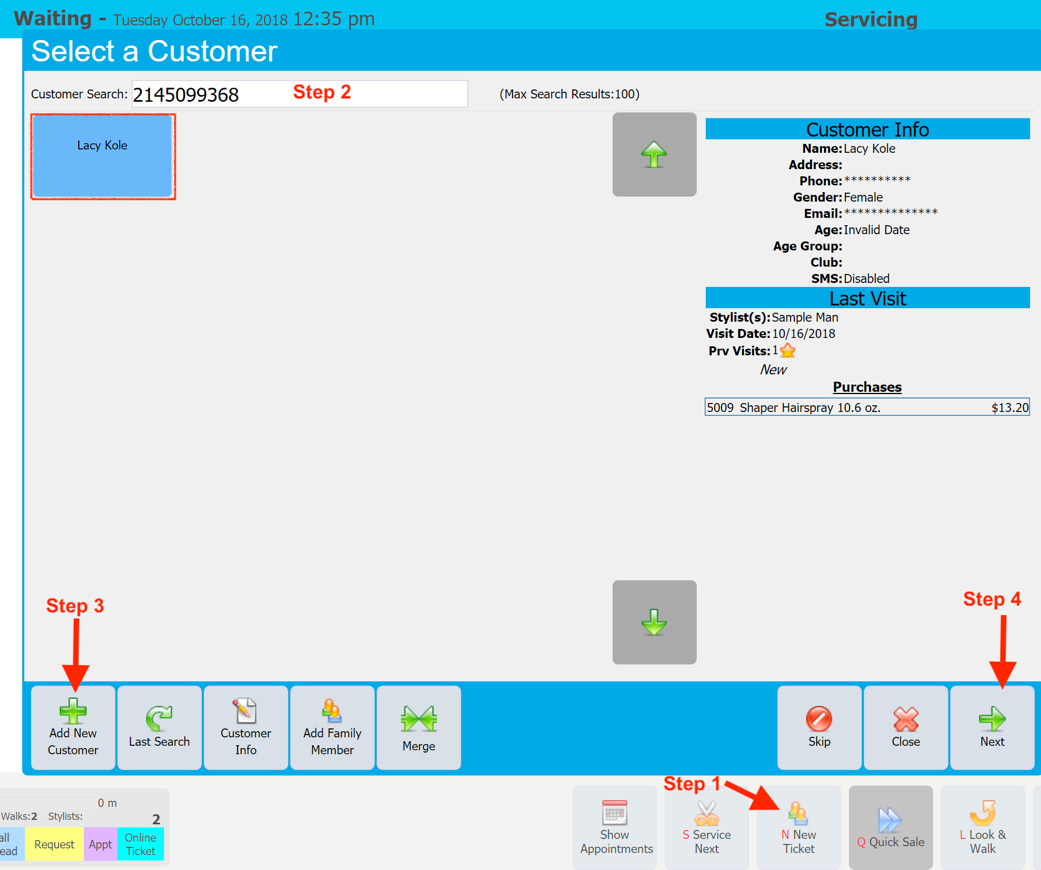
4. Click on Next button at the bottom right of the screen to start the process of refund/exchange.
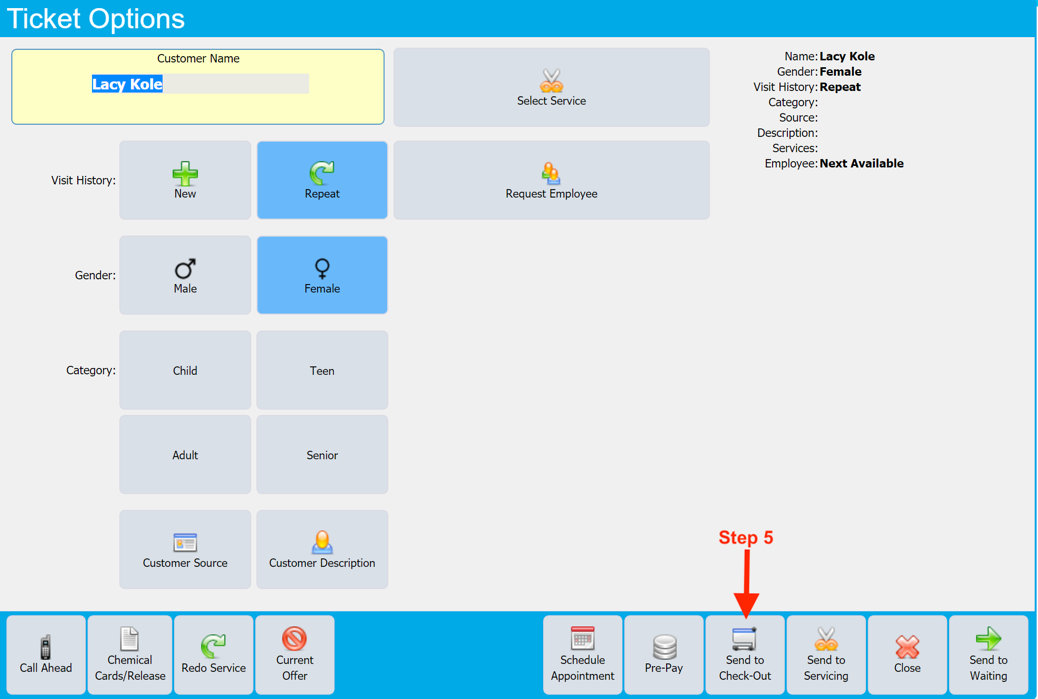
5. On the Ticket Options screen click on the bottom right on Send to Check-Out button and you will have an option to select the stylist doing the refund.
6. On the Check-out screen click on the Refund button on the left side of the screen
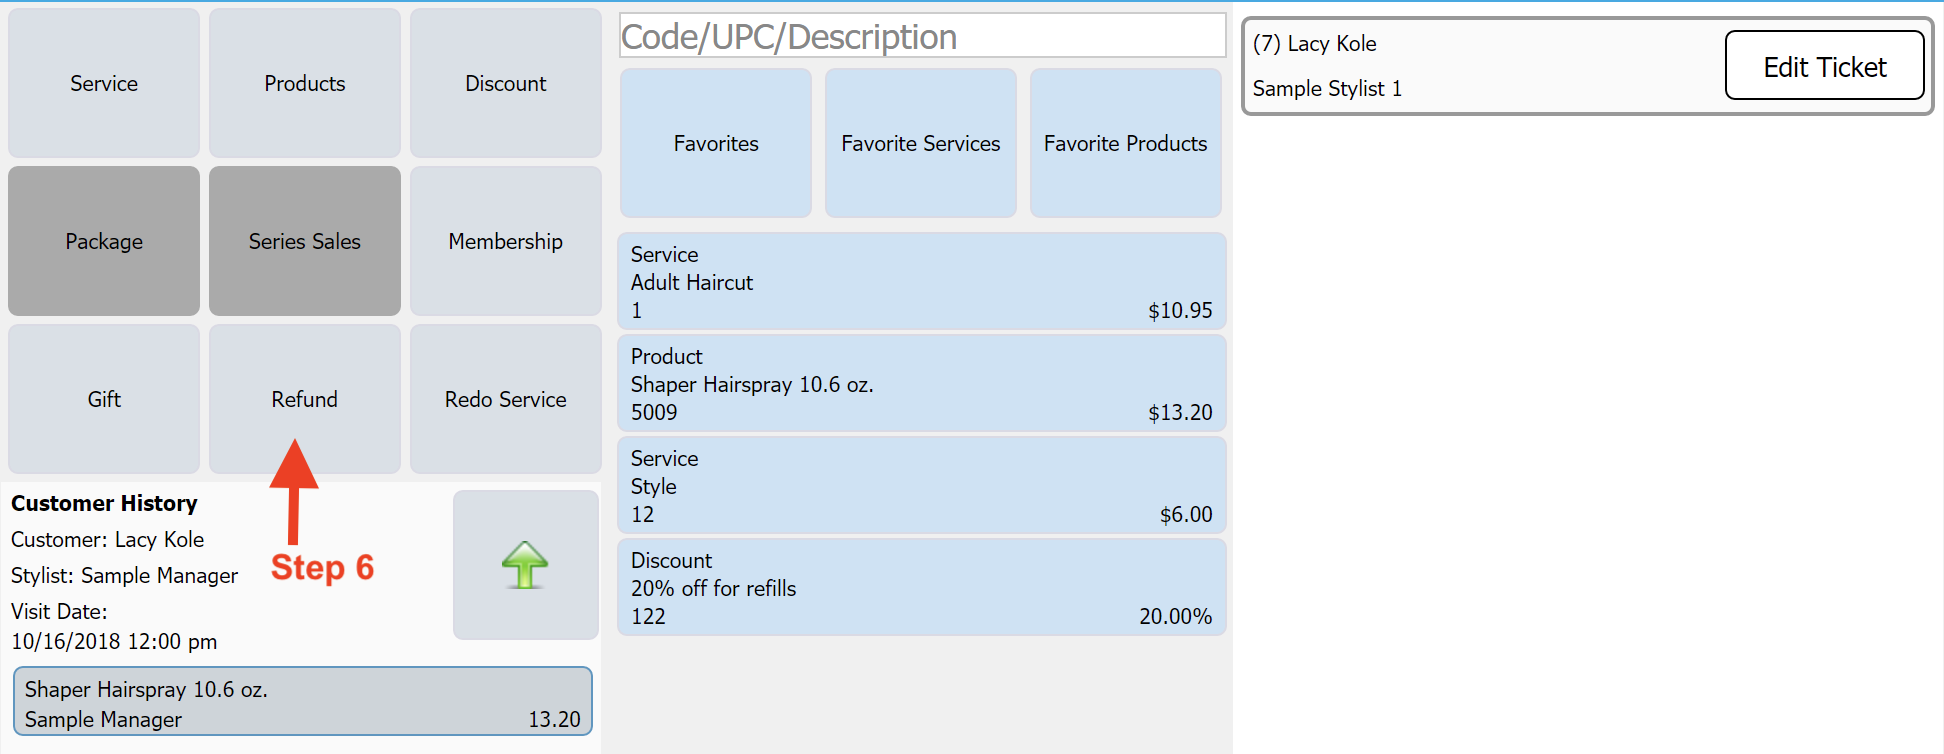
7. The following window will pop up to select the Service/Product that needs to be refunded.
a. First select if Service is being refunded
b. Select the item by searching for the service by name on the Search area.
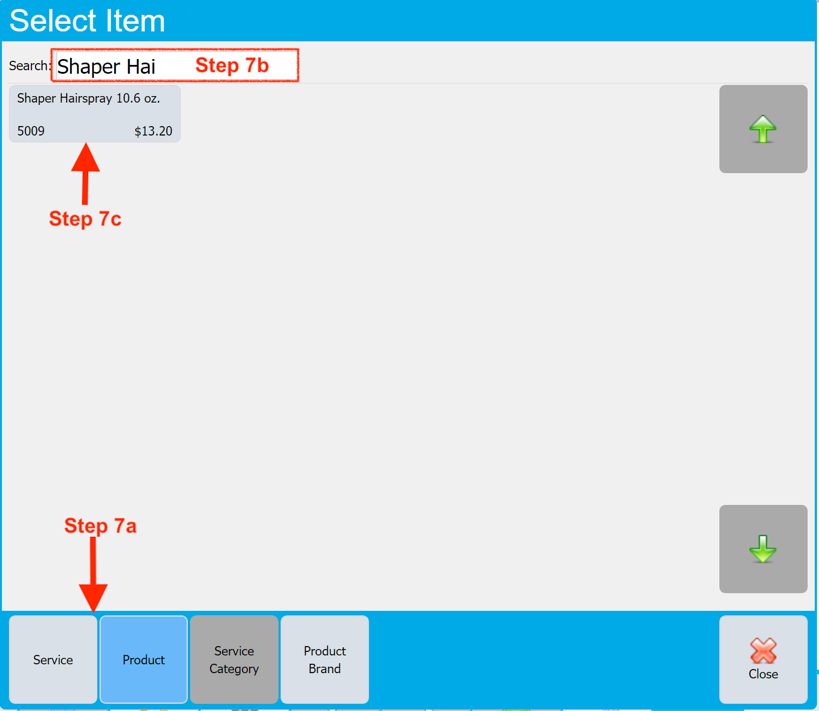
c. Select the Product/Service by clicking on the item.
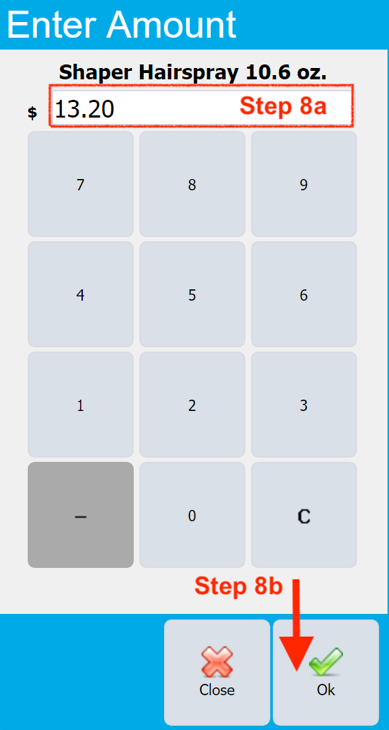
8. Now a Pop up window will show the price for the product/service.
a. If the price matches with what was paid by the customer (verifying on the receipt) then go to next step. If not then adjust the price as paid by the customer.
b. Click OK
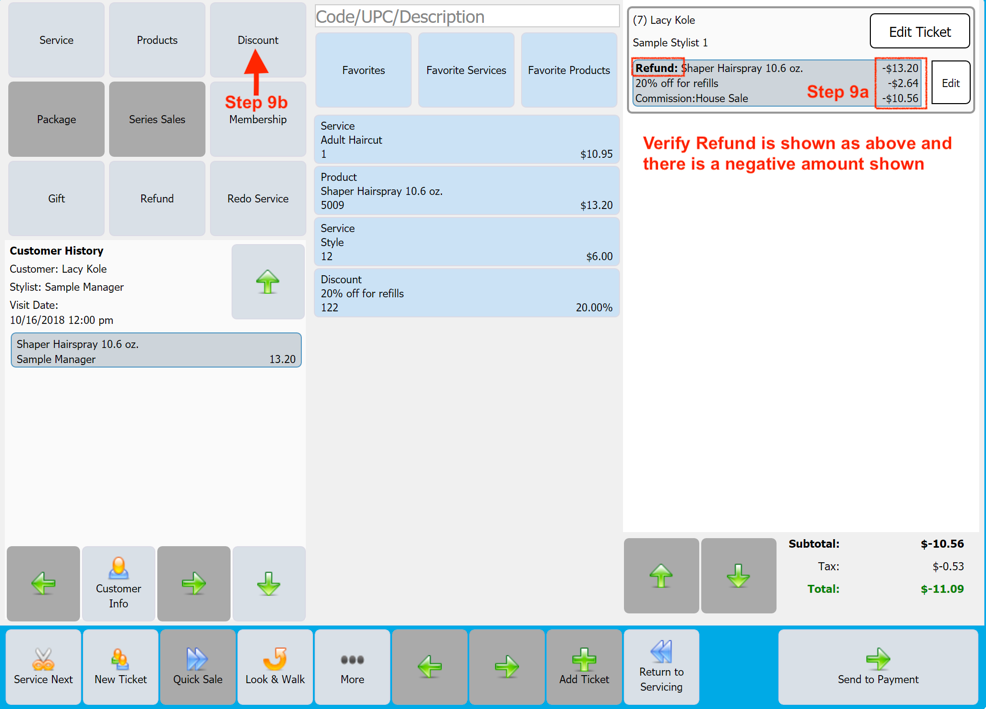
9. The refund item is now added to the ticket.
a. Verify that the amount matches the original ticket.
b. If any discount was applied on original ticket then click on Discount button and apply the same discount.
10. If there are other products/services that needs to be refunded then repeat steps 6-9.
11. If customer wants to exchange for another product then on the middle of the white text screen shown in the below picture as RED box (Step 11) enter the SKU number or use the barcode scanner to scan the product.
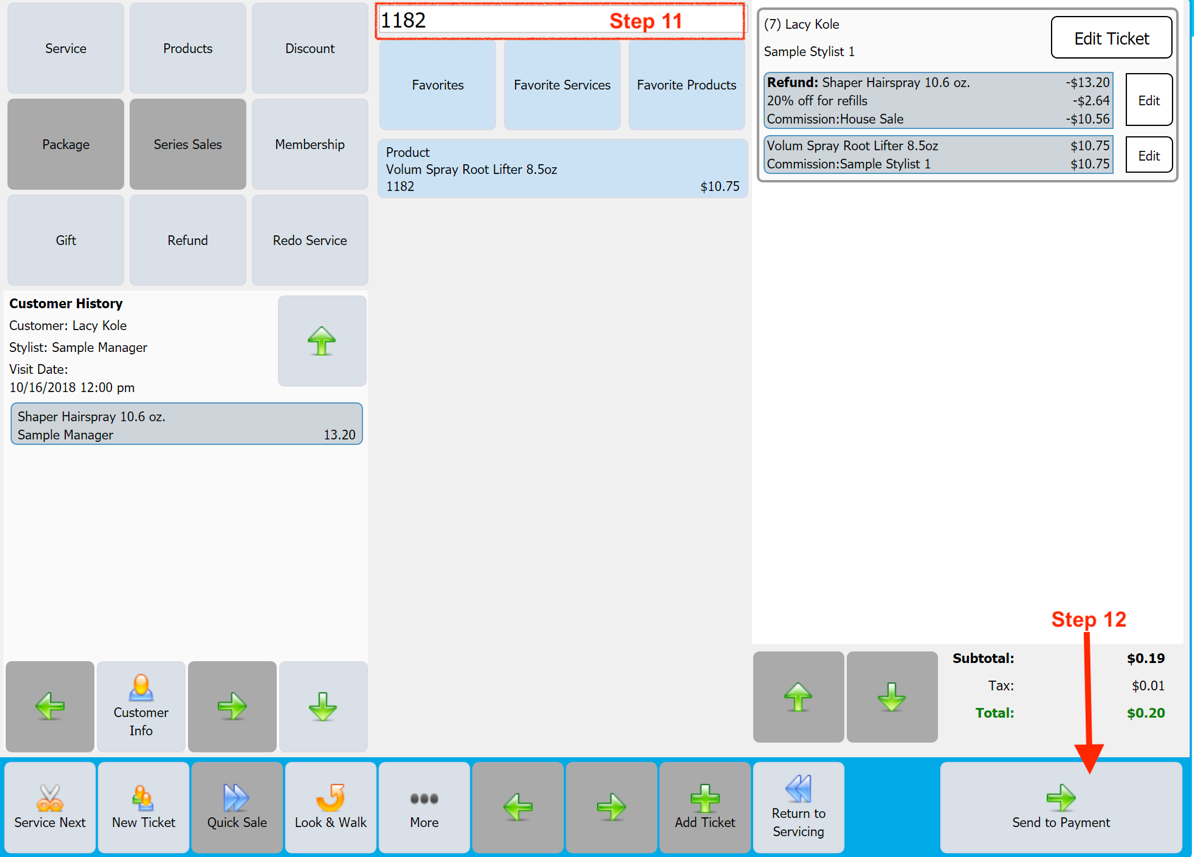
12. Finally verify if the ticket for return/exchange is correct. If yes click on Send to Payment at the bottom right. Now start the payment process as usual.
IMPORTANT: All refunds must be made on the same payment as the original ticket. If the customer paid by Credit card then it must be put back on a credit card. Cash should only be refunded if the customer paid by cash. Even if customer used Debit card it must be put back on the debit card.
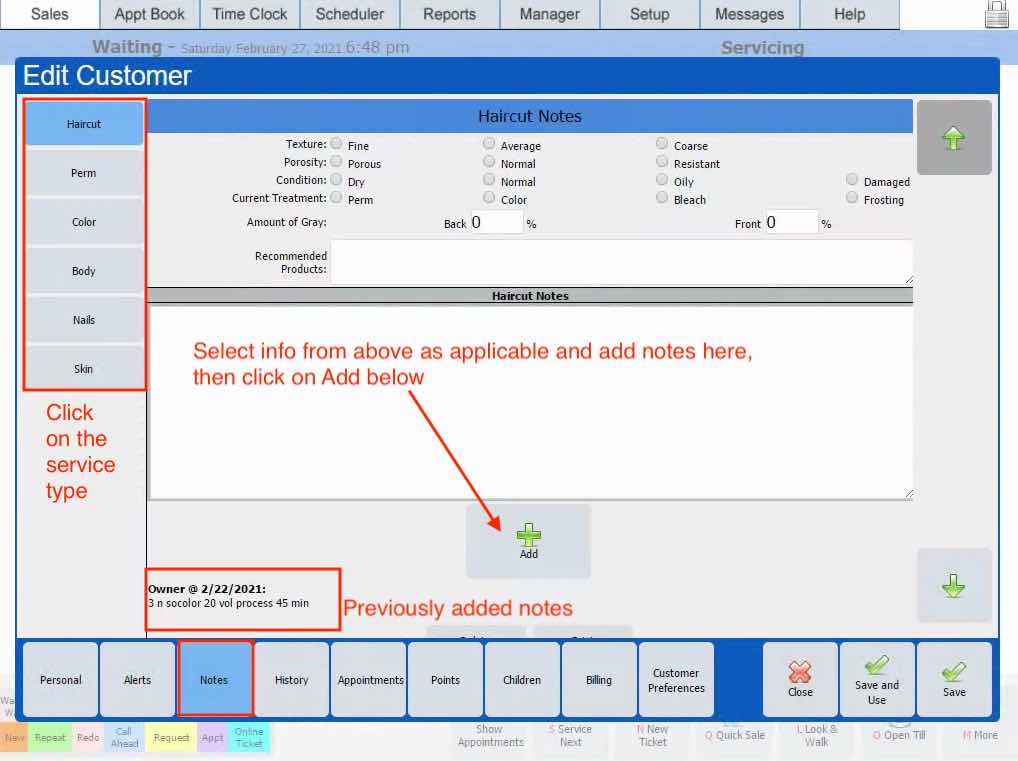
Once a service is completed for a customer the notes regarding the service must be updated on the POS. If notes are added then if the customer comes back and get the same service then you will get a printout of these notes to help with the service.
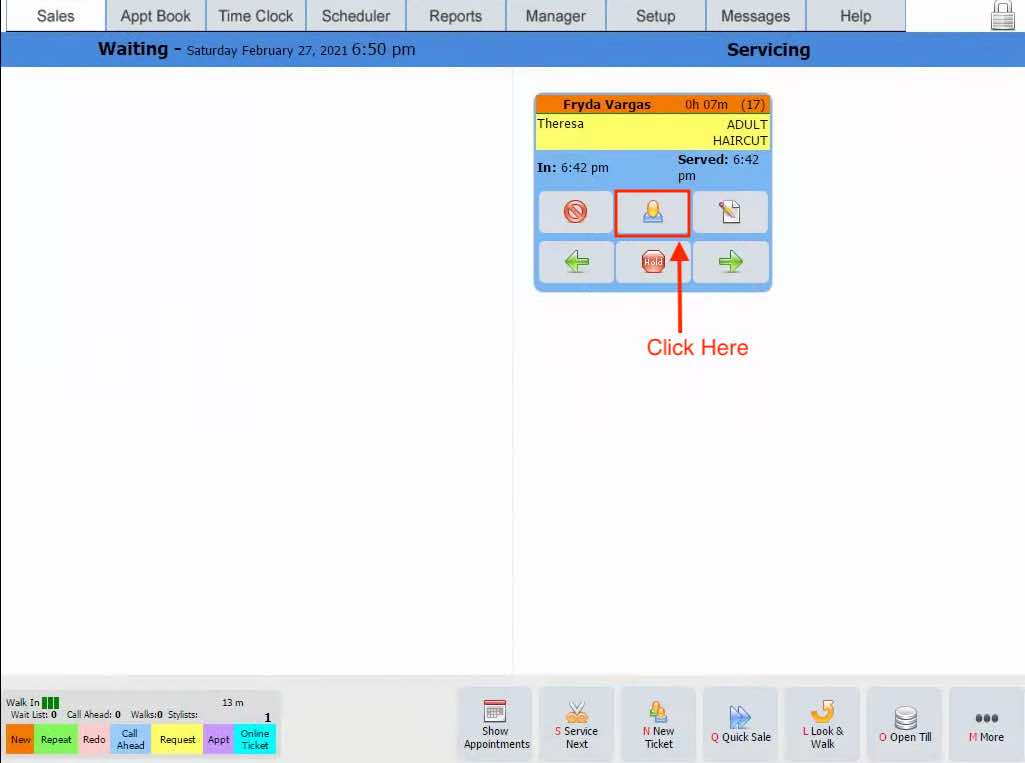
Step 1: Click on the red box shown from the servicing side of the Sales screen.
Step 2: Click on the red box shown bottom, Notes, and the screen shown below will be seen. Click on the service type shown on the left side of the screen. Next add the notes specific to the service including products used, amount of time took for the service, etc. Finally click on Add as shown below to save this information. Any previous notes can been seen towards the botoom of the screen as shown below.
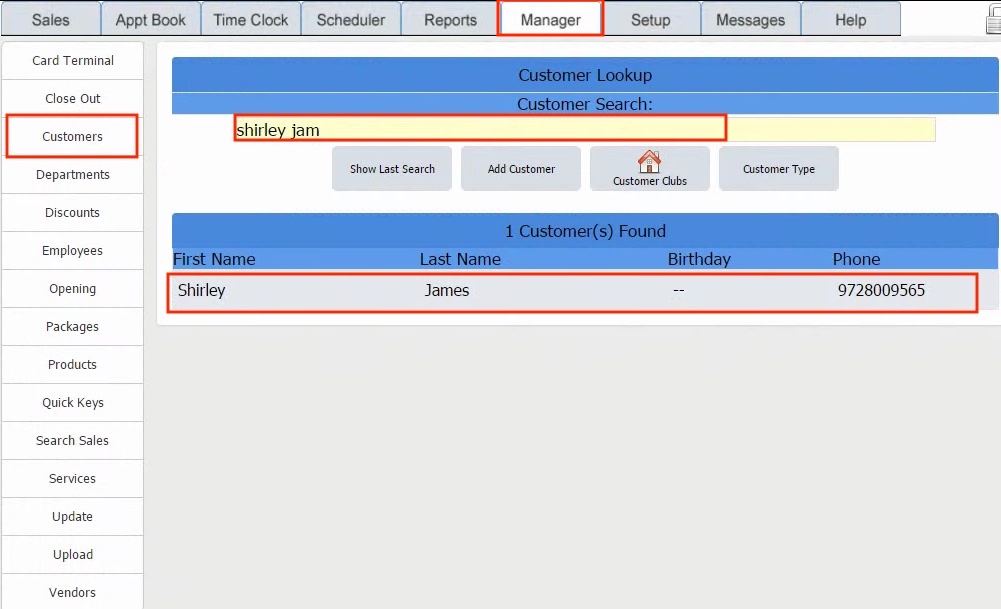
If a customer information was not added while doing service you can do this anytime by going to Manager --> Customers then search customer by name or phone number as shown below. Once you find the name and click on it. This will take you to the customer information page (See above) where you can add notes, see history, etc.