
Manager Related Forms are available here
https://drive.google.com/drive/folders/1zelF25WJYtdVVYFCZXy_FSgp0WpyUO7a?usp=sharing
Make sure to go to the specific salon folder and then find the order you recieved so you can get the correct label.
Click here to go to the directory to download the label
Instruction on how to find the label for your order
If you are using the POS please follow the following steps
1. Click on the windows key from the keyboard

2. Click on Google chrome from the bottom of the screen as shown below.

3. Once Chrome opens click on the Retail Product Labels bookmark from the top of the chrome page and once you get to the page click on your specific location to get invoices or labels.

From any other computer you can follow the instructions below.
1. First go to alarek.com website click as shown below to get to the google drive so you can download the label
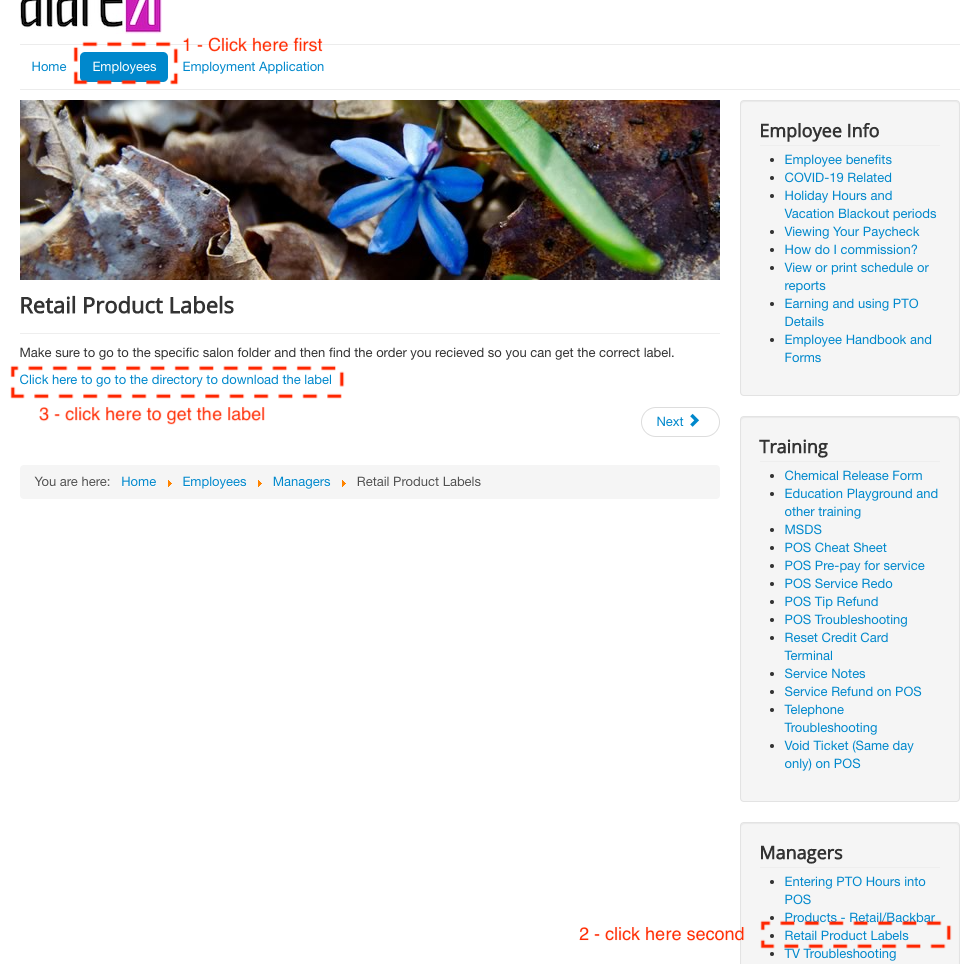 2. Once you click on the google drive link you will see the following so you can find the salon folder.

3. Find the order number and click on the file to see and print or you can download

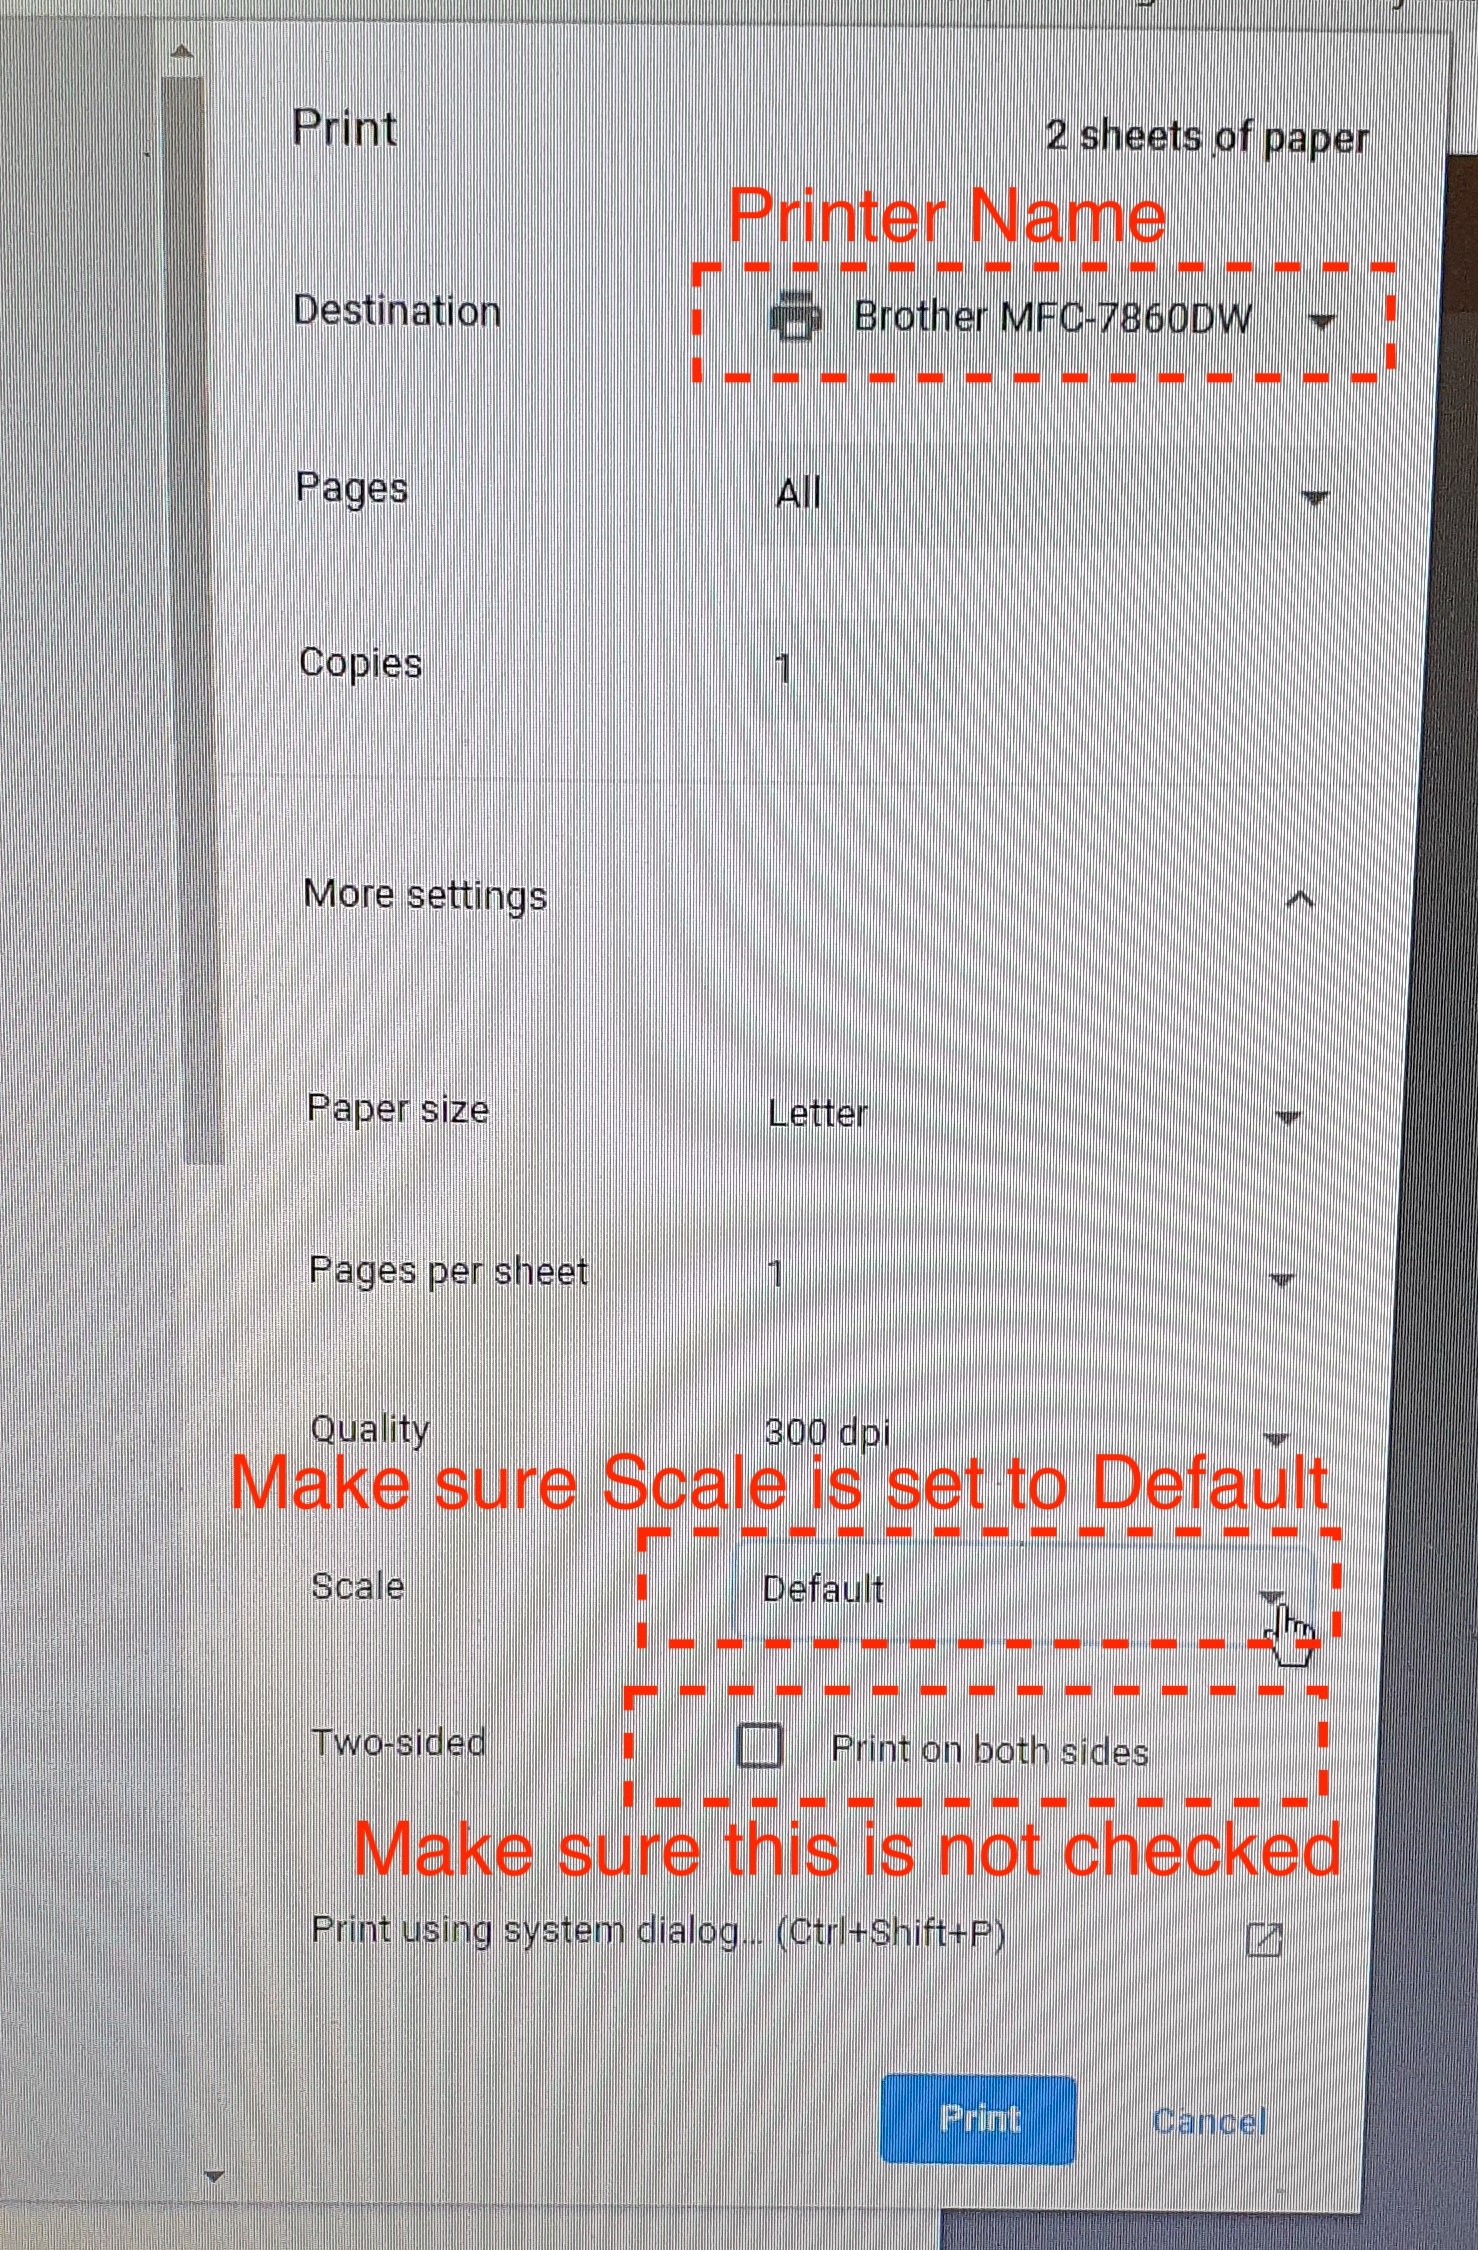
3. Click on the file name and you should be given the option to print and click on the printer button. Please make sure the following setting are correct before printing. Also make sure you have put the lables in the printer upside down(label should be facing down).
How to enter PTO/Vacation Hours into POS
PTO can only be taken during non-blackout periods. Please go to the Alarek link to know holidays and blackout periods.
Everyone must follow this guideline (Mandatory):
- Stylists should notify Manager verbally or in a written requests two weeks prior to PTO unless if there is a true emergency such as sickness or family related matters. Manager needs to notify Owner of such PTO hours via email or text as soon as they are aware of this. Owner will verify stylists PTO hours and approve the request. Manager should enter these hours following the instruction in this document after Owner approval only.
- Manager should notify and get approval from Owner prior to planning for PTO hours unless if there is an emergency as specified above. Manager needs to notify Owner at least two weeks prior to taking planned PTO hours. Once approved by the Owner, Manager should follow the same instruction here to put in the PTO hours.
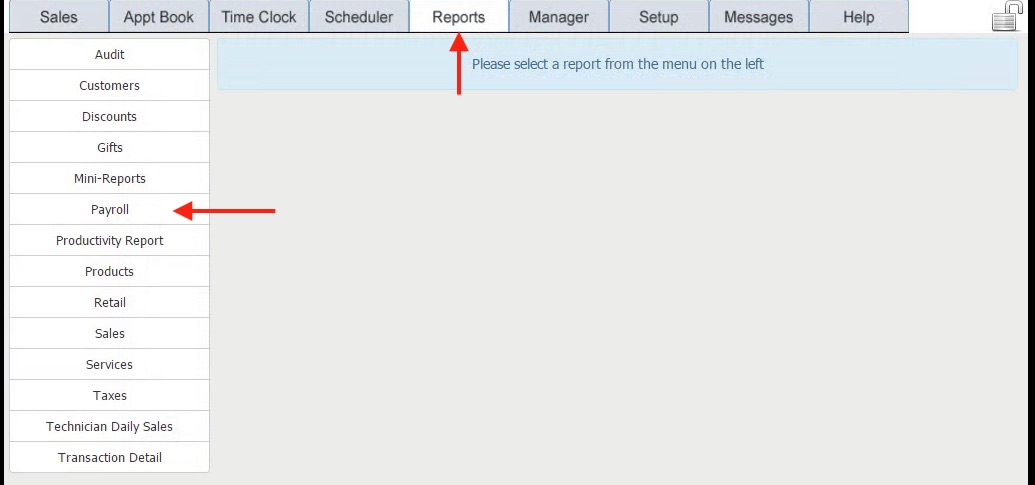
Step 1: Go to Reports-->Payroll from the POS main menu.
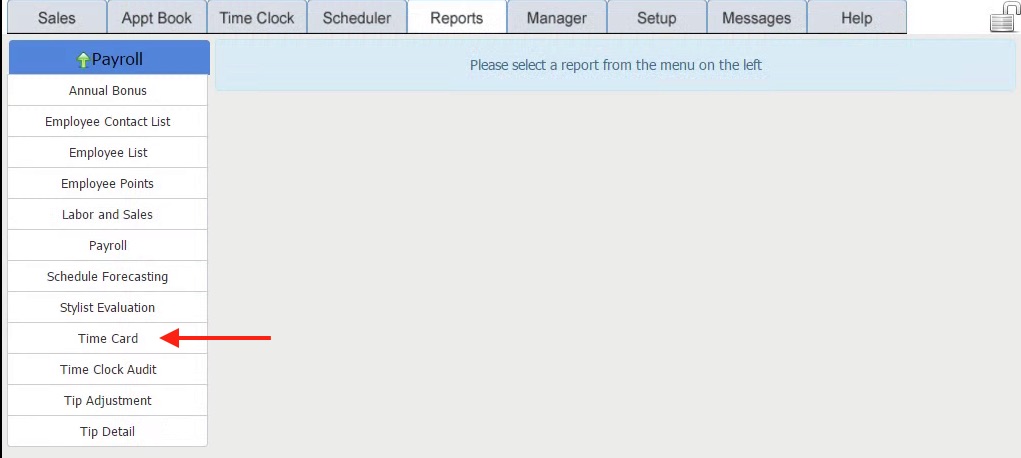
Step 2: Under the Payroll Report choose Time Card as shown below
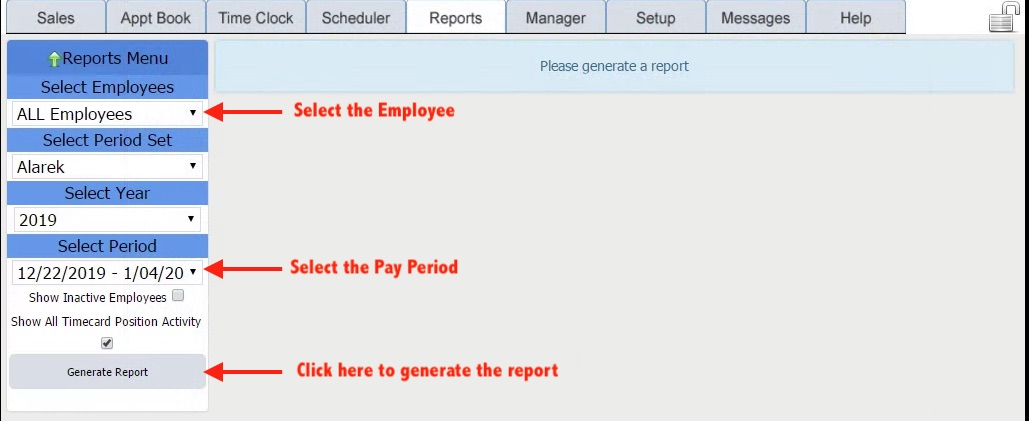
Step 3: Select the Employee and Pay Period when the PTO will happen and click on Generate Report as shown in the picture below.
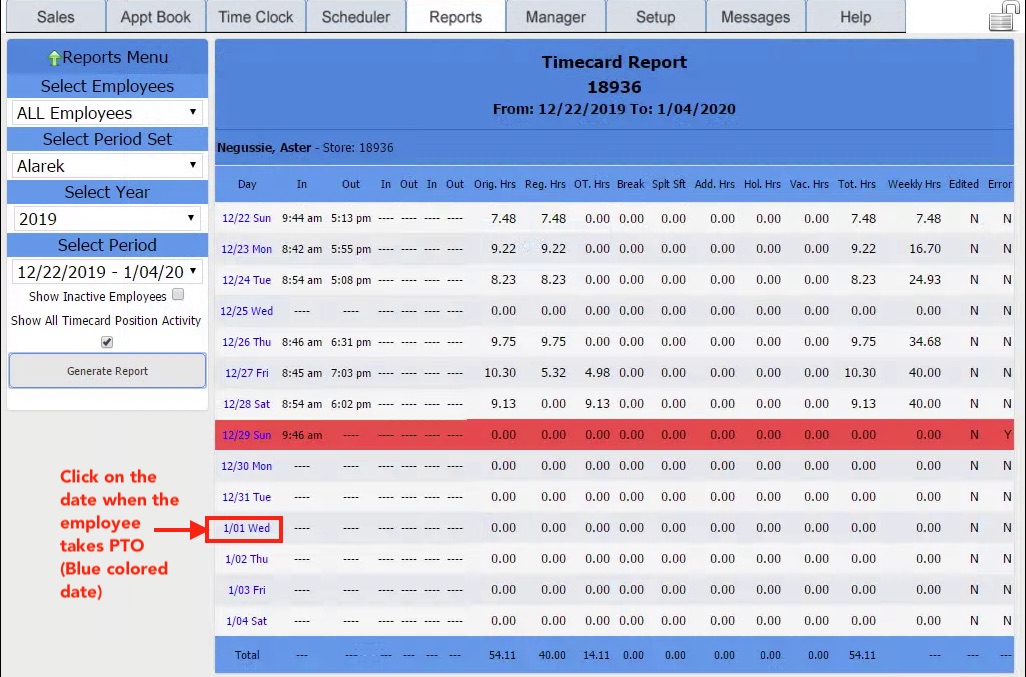
Step 4: From the generated pay period click on the date the PTO hours need to be applied as shown below. Click on the date shown in blue. The date should be a non-working day. PTO cannot be entered on working days.
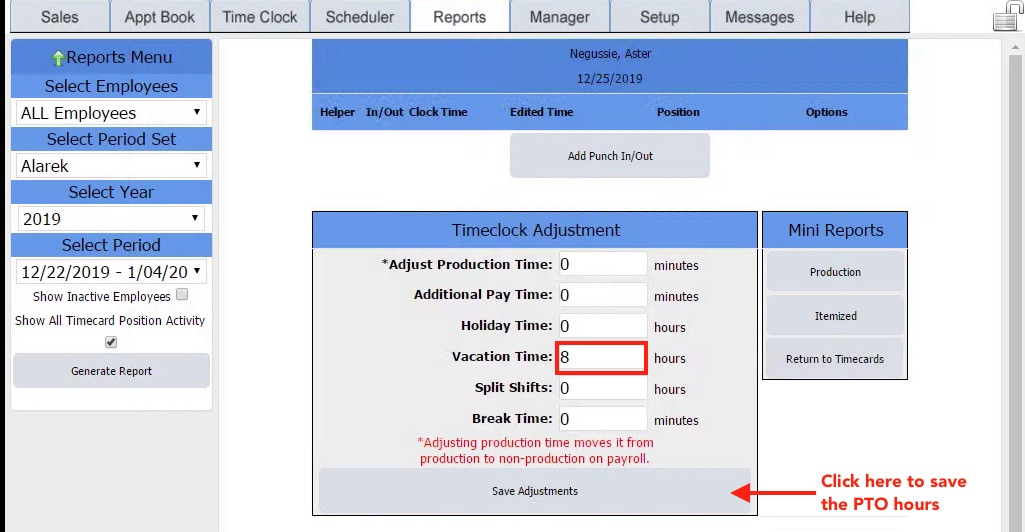
Step 5: Once you click on the date you should see screen as shown below. Here in the Vacation Time enter a value between 1-8 hours. You cannot enter more than 8 hours in a day.
Step 6: Repeat step 5 if employee is taking multiple days. Employees are not allowed to take more than 40 hours of PTO in one week.
How to Adjust/Transfer Products in POS
There are times when products need to be transferred or adjusted due to various reasons. Here are the instructions on how to do this properly.
Transfer, Adjust or Count
- Transfer in or out – Should be used when transferring products from Retail to Backbar or vice-versa.
- Adjust in or out – Should be used be used when products need to be removed from inventory due to breakage, loss, theft, breaking gift sets to sell individually.
- Count – Should be used when and if one individual product count needs to be adjusted.
Step 1: Go to ManageràProducts from the POS main menu.
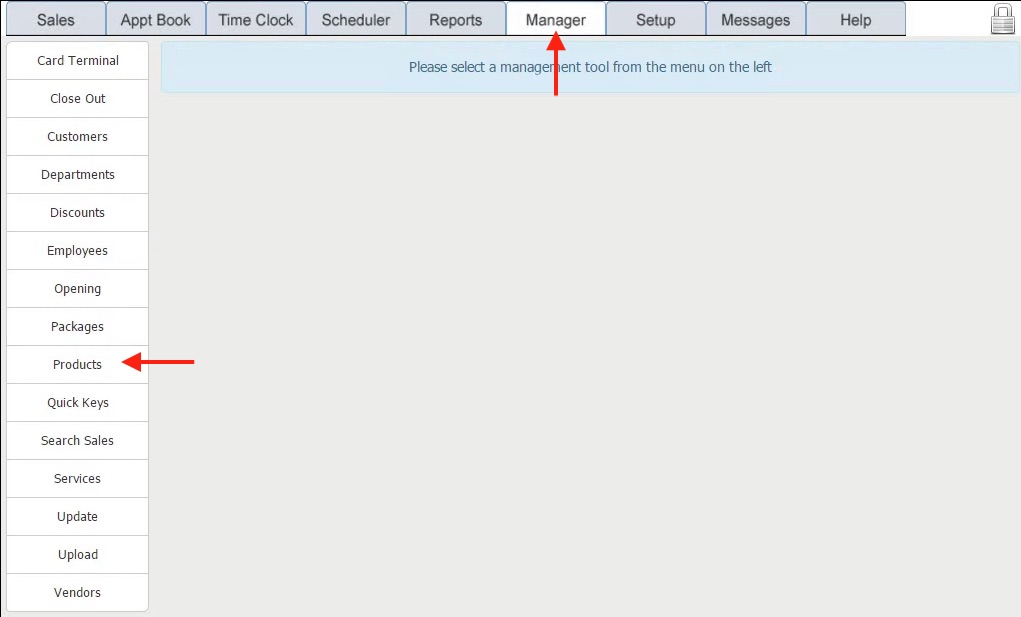
Step 2: Once on the Products screen click on Inventory Manager as shown below
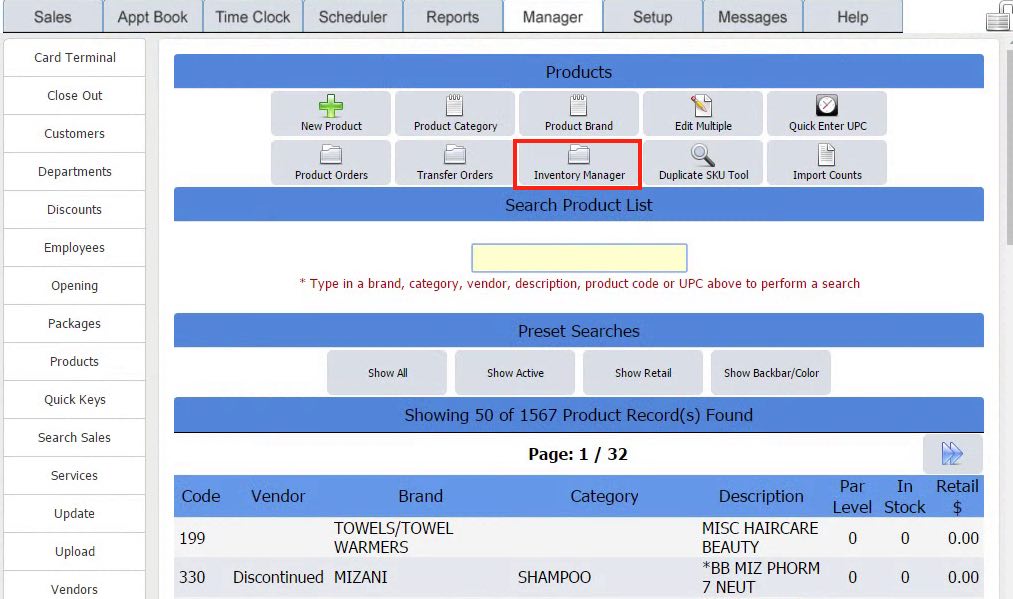
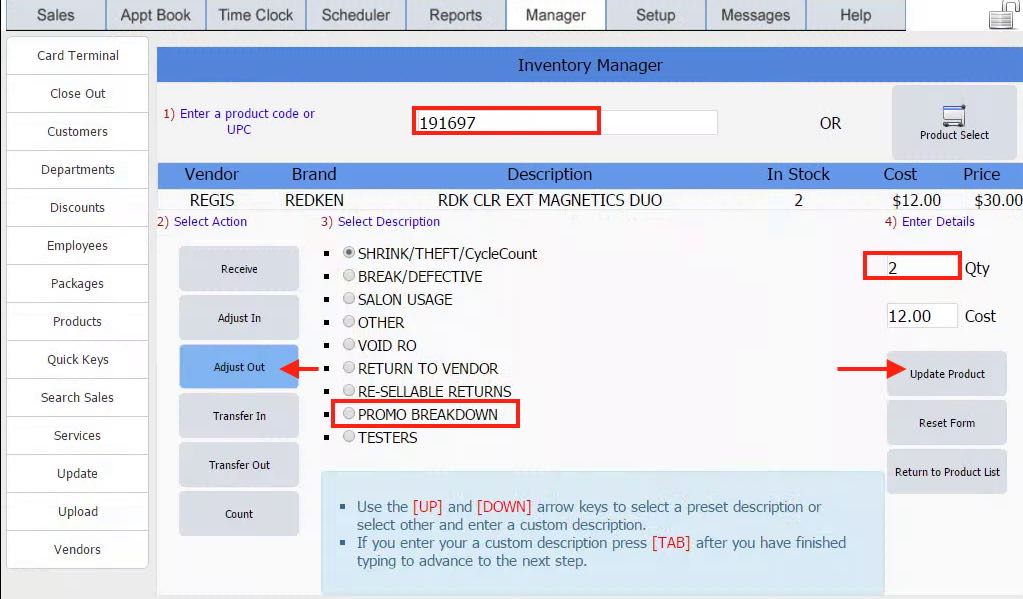
Step 3: Here in this example we will Adjust Out one Gift Set from inventory and select promo breakdown as the description. Here the Redken 191697 gift set, 2 in stock will be Adjusted out from inventory. Enter the SKU in the top of the screen as shown, then Adjust Out on the left of the screen, select Promo Breakdown as the description, next enter the quantity (in this case we are going to breakdown 2 gift sets so select 2) and finally click on update product button to save this.
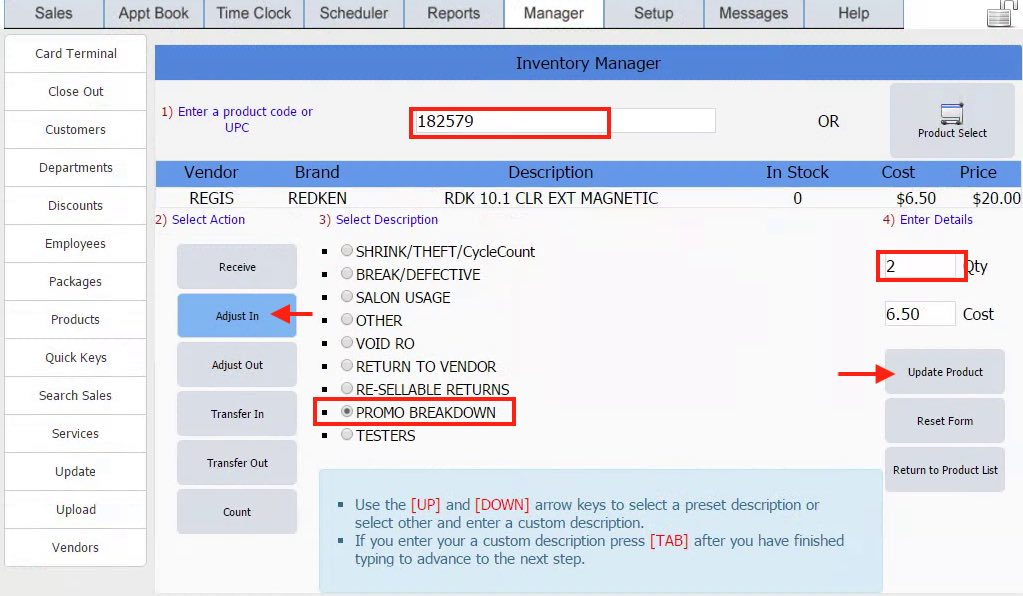
Step 4: Now breakdown the Gift Sets and take out the products. Go to planogram or shelf and get the SKU numbers for these products. In this example Redken 10.1 oz shampoo is 182579 and Redken conditioner 8.5 oz in 182580. On the POS enter the first SKU, 182579, select Adjust In, next enter 2 for quantity as you have 2 from the box boxes and finally click on Update Product so save this.
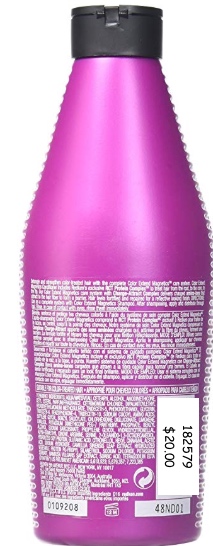
Labeling the SKU on product: Please get a blank label you receive from Regis (always there are some blank ones in the shipment and keep these). Put the label on the UPC code as shown here.
Step 5: Transferring is another option, here is an example. This is used only when something from Retail shelf is transferred out to backbar. This should not be a regular occurrence and only in an emergency.
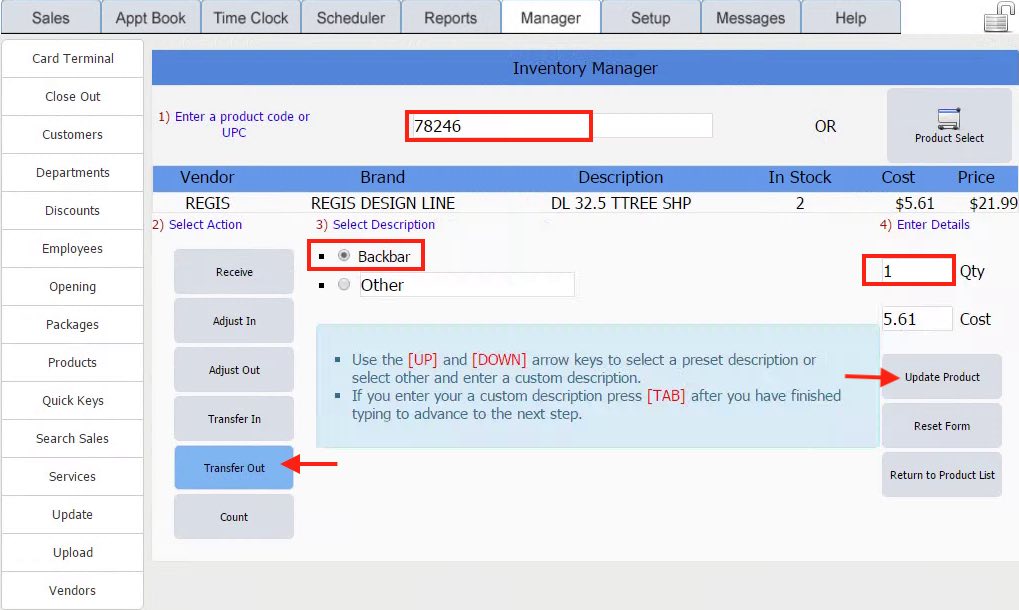
From the Inventory Manger screen, enter the SKU, next click on Transfer Out, select Backbar as the description, next enter the quantity, and finally click on the Update Product to save into inventory this change.
If the TV at the salon is not working please follow instructions below
- If the power light is RED (shown in yellow circle on the picture below) the TV is turned OFF. Use the TV remote and press the power button or press the power button at the bottom of the TV as shown in the picture below
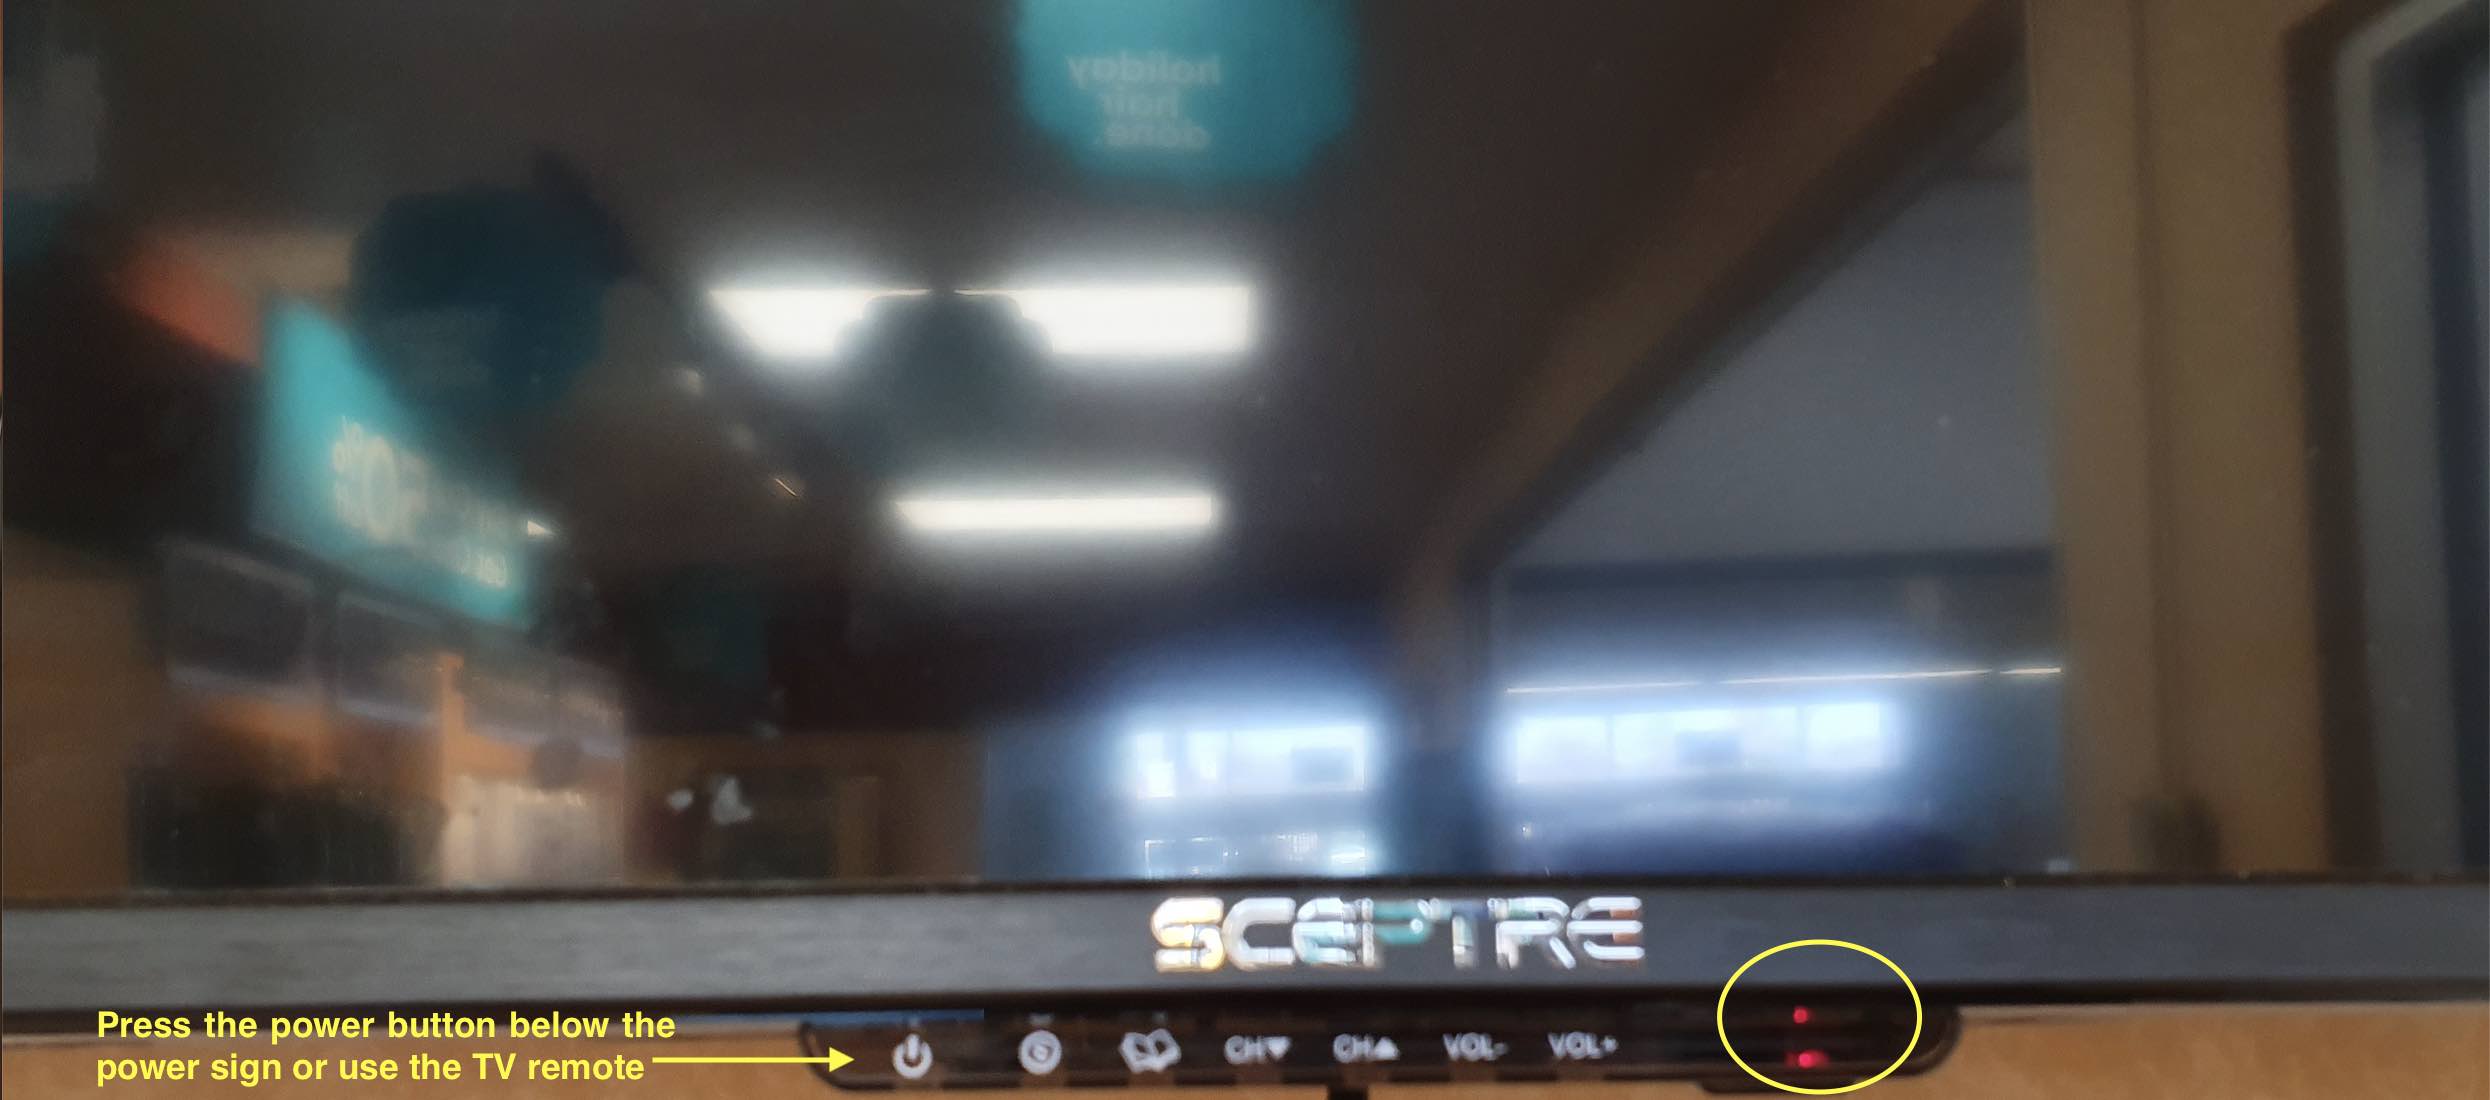
- Once the TV is turned on the RED light will turn to BLUE and once fully loaded you should see the Amazon FireTV screen as shown below.
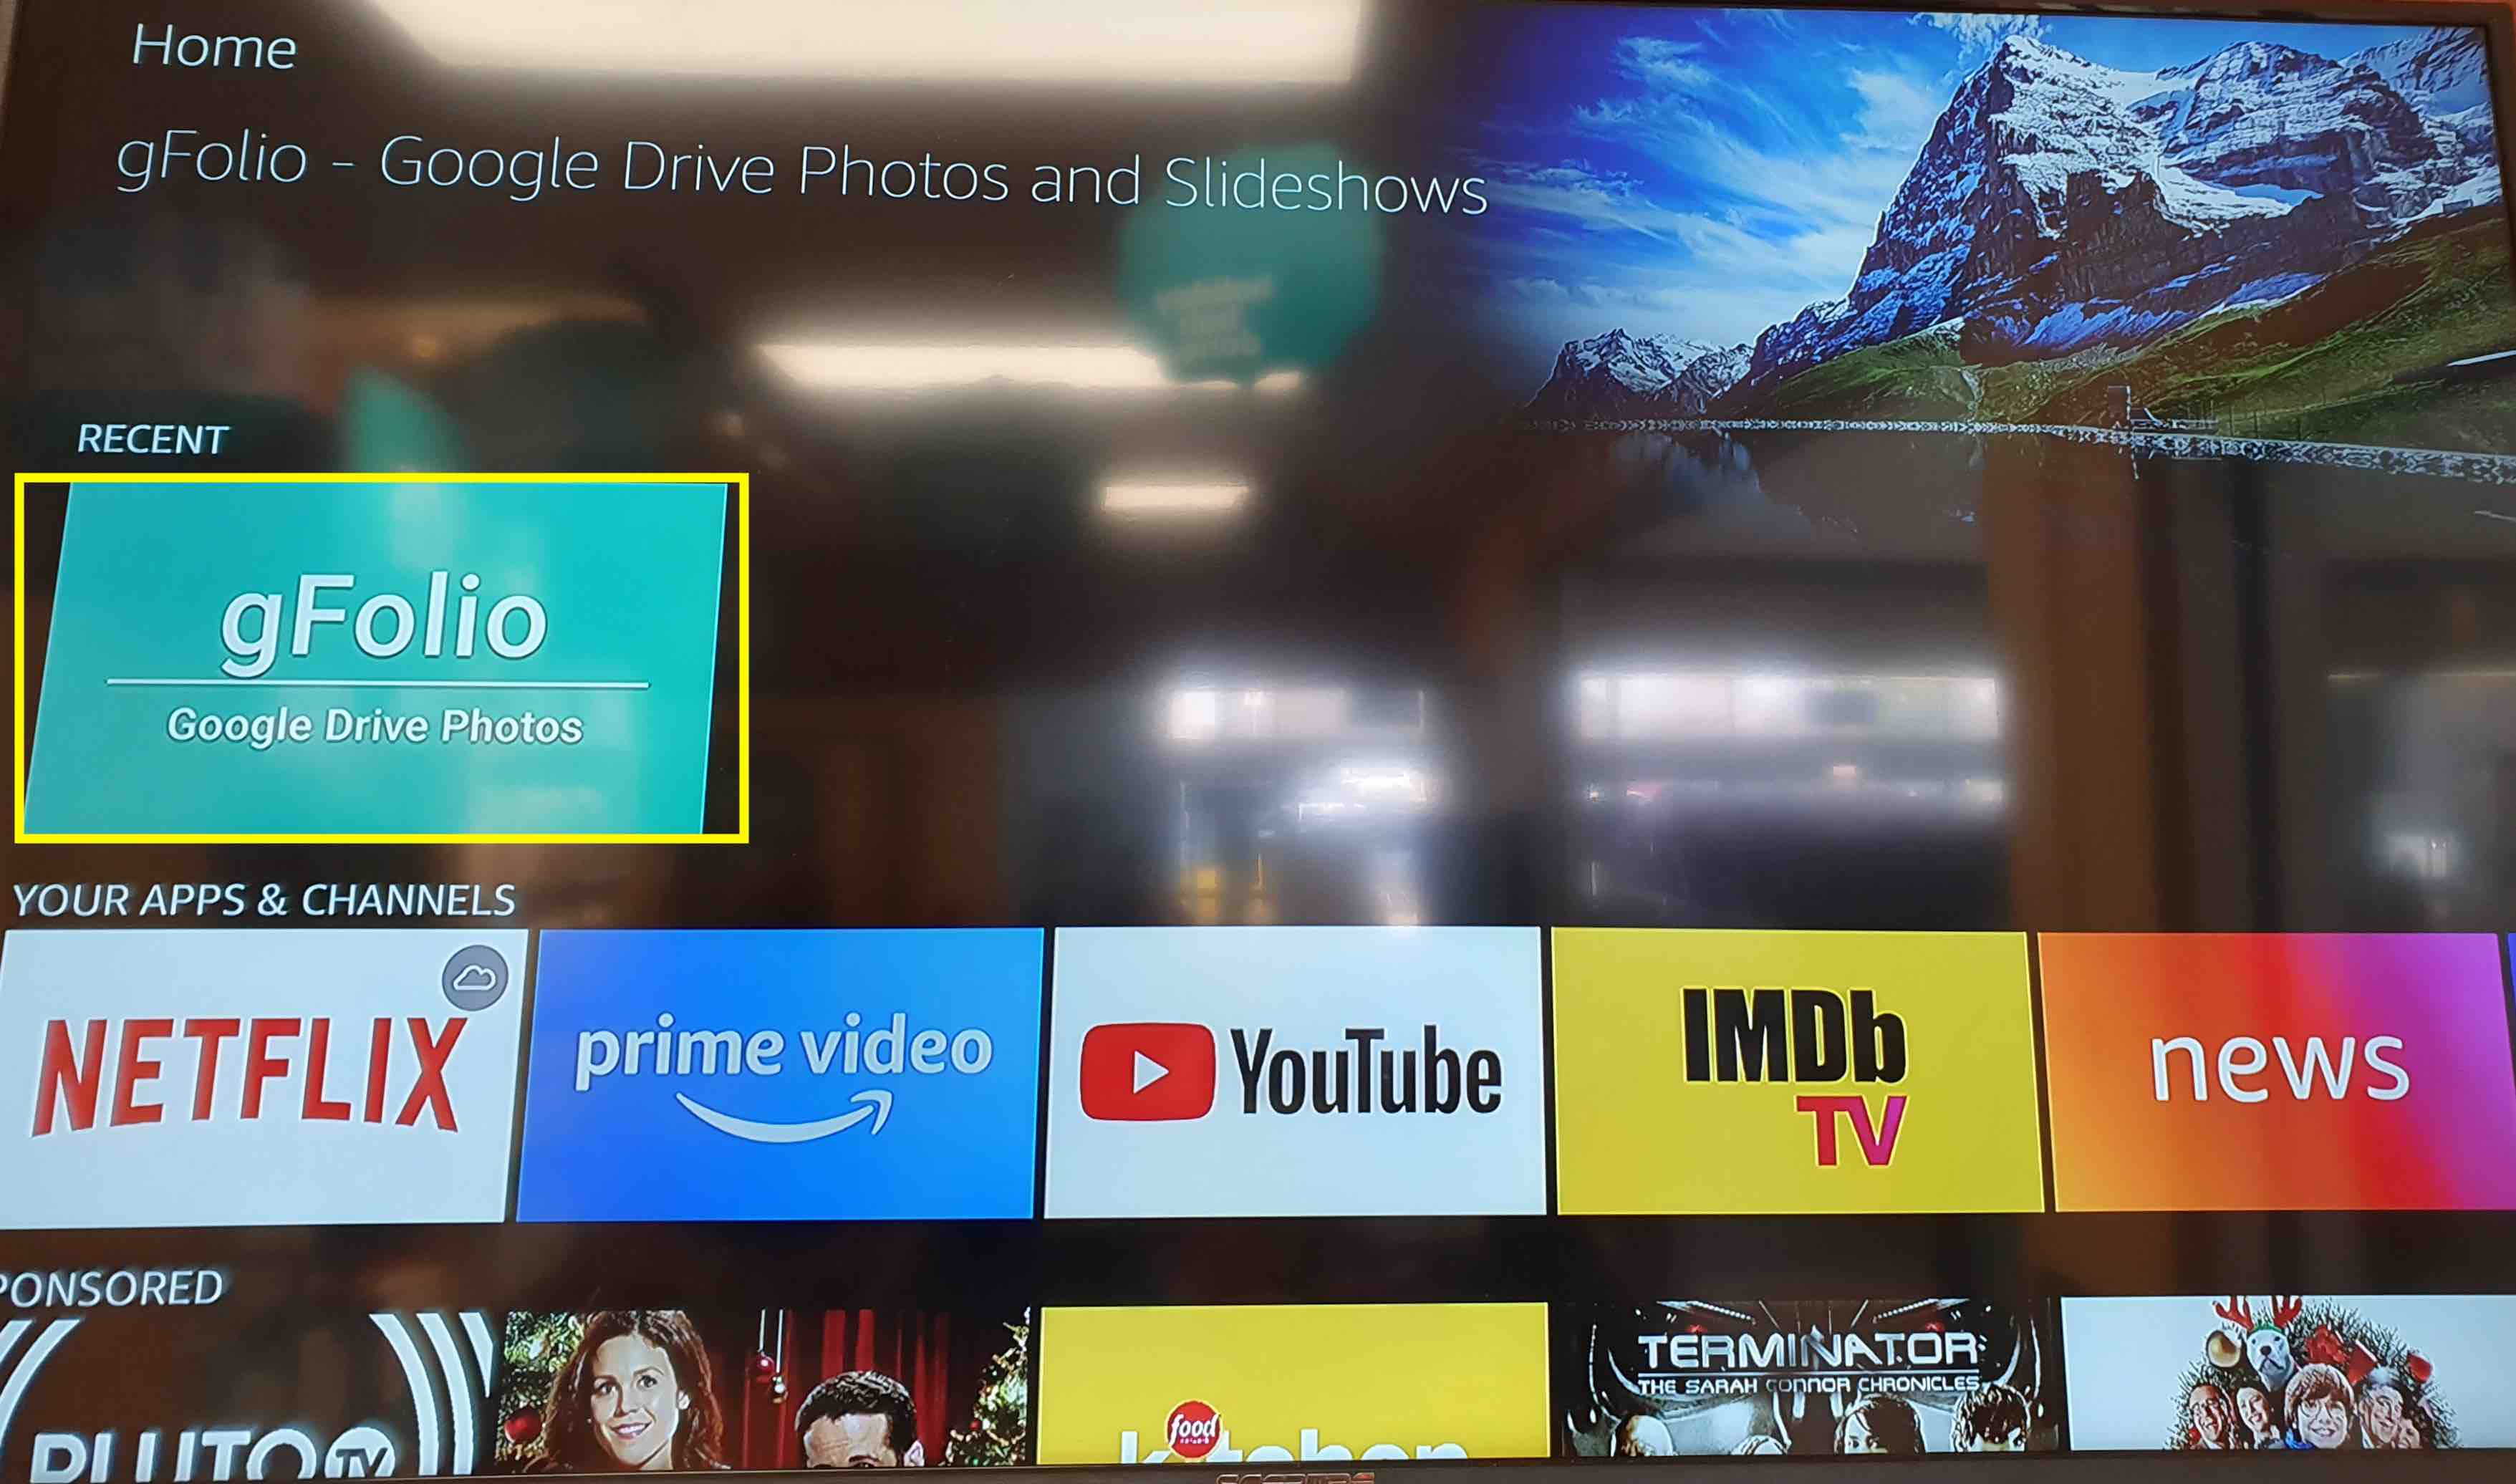
- If you do see the screen above use the Amazon FireTV remote, show below and use the big circle button to move up/down/left/right and select the gFolio app from the screen. Once highlighted click the select button in the middle of the circle.

- If you are not seeing the Amazon TV as shown in Step 2, please press the HOME key on the Amazon FireTV remote.
- If this doesn’t work please call Gee, 469.412.3210

